


MANTA TRAWL TRAWLSHARE PROTOCOLS
A note on communication: The TrawlShare program depends on our citizen scientists sharing their experiences. In addition to providing data, please share photos on social media and hastag #5GyresTrawlShare. Our team will report and highlight your efforts to the 5 Gyres community.
HOW TO COLLECT AN OCEAN SAMPLE
MATERIALS PROVIDED BY 5 GYRES:
5 Gyres Trawl (Manta Trawl) Data Sheets and Graph Paper
OTHER MATERIALS YOU WILL NEED:
1mm Sieve
Metal Tweezers, Metal Spoon, and Toothbrush (with natural bristles) Wash Bottle
Handheld Magnifying Glass
Ruler
Digital Camera
Envelopes or Sample Jars
Flow Meter (Optional)
TRAWL ASSEMBLY – Once you receive the trawl, you will need to put it together. For the Manta Trawl, you will need to attached the two wings with the provided bolts. Please use a piece of sand paper to smooth the end of the PVC pipe that attaches to the cod end (best to do over a garbage can). You will also need to attach the cod end to one side of the PVC pipe with one of the hose clamps. Then attach the other side to the end of the netting with the other hose clamp. Make sure all fasteners are VERY tight. They tend to slip off easily when deployed. Plan to tighten them before each deployment. Attach the bridle and you’re ready to go!
DATA RECORDING - Record all information for “Start/Stop Data” and “Sea and Boat Conditions” at deploment and recovery of each trawl. Number each sample separately. Sea State, Boat Speed, Boat Direction, Wind Direction, and Wind Speed will be recorded at deploymet and recovery. If possible, use the onboard knot meter to determine boat speed. If you are using a flow meter, attach the flow meter so that it falls in the center of the mouth of the trawl (not below the trawl).
POSSIBLE PERMITTING REQUIREMENTS - If you are within 200 miles of a shoreline, you may need environmental permits from state and federal agencies to
carryout data collection. The requirements vary state to state and country to country, but generally speaking, it is good to contact your state agency to confirm that you do not need any specific permits. Special areas, like marine protected areas and sanctuaries, often require additional clearance. These are things to take into consideration when planning your project.

DEPLOYMENT - Deploy the trawl outside of the wake zone to the best of your ability. Turbulence inside the wake zone does can push plastic deep underwater. You may wish to use a spinnaker pole or a davit to position the trawl tow line away from the side of the boat. Watch the net while you trawl to observe its performance and adjust the length of the tow line and vessel speed if it’s bouncing along the surface.

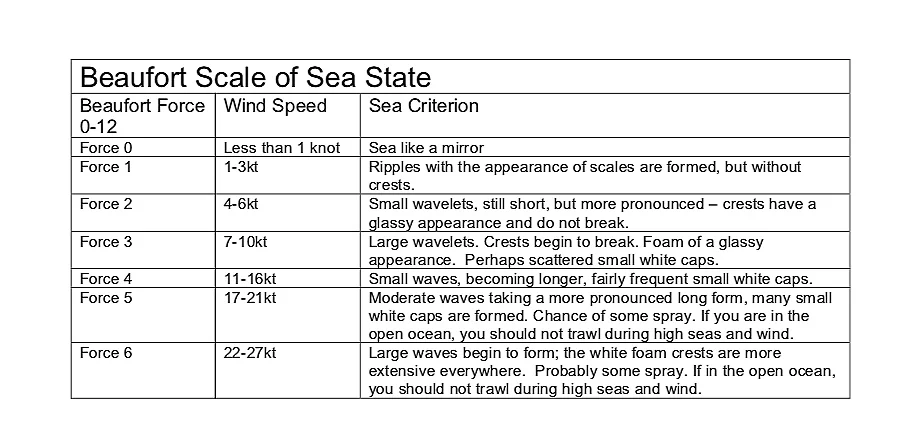
TRAWL SPEED/DIRECTION – Maintain a steady linear course (you do not want the tow line to come under the vessel). The vessel should go <3 knots while towing the Manta Trawl. If the trawl is leaping out of the water or plowing under a wave, then you’re going too fast. Watch the trawl and adjust accordingly. Remember not to trawl in Sea State 4 or above. You need to watch the sea state and may need to recover the trawl if winds are above 16 knots. The trawl should not bounce or dip below the surface. It should travel smoothly across the water surface.
TRAWL DURATION – The Manta Trawl should be deployed for 30 minutes (up to 60 minutes), ideally in a straight transect. You want to avoid letting the cod end on the
back of the trawl fill with zooplankton, which can happen when trawling at dusk when zoolankton migrate to the surface.
RECOVER TRAWL - Recover and secure trawl on boat (watch any loose lines). Record STOP DATA immediately. It is very important to record the most accurate latutitude and longitude.

HOW TO ANALYZE AN OCEAN SAMPLE
MATERIALS YOU WILL NEED:
1mm Sieve
Metal Tweezers, Metal Spoon, and Toothbrush (with natural bristles) Wash Bottle
Handheld Magnifying Glass
Ruler
Digital Scale
Digital Camera
Envelopes or Sample Jars
SAMPLE PREPARATION
1. Pour sample from codend in to the 1 mm sieve and use spoon/toothbrush to brush it all in.
2. Rinse the codend and toothbrush gently with the wash bottle so that all plastic particles are included.

SAMPLE SORTING
Use tweezers to remove all recognisable pieces of plastic from the 1 mm sieve, and transfer all plastic materials directly into a glass bowl or jar, or onto graph paper (provided).
Use the magnifying glass to look closely at the surface of the particles to make sure they are plastic. You may also use the tweezers to see if they are solid (plastic) or soft (usually not plastic).
Lay all plastic pieces on graph paper (if possible, let it dry some place undisturbed). Using the ruler or lines on the graph paper, separate plastic pieces into size and type categories:
a. Size categories-(particles>5mm),(particles<5mm)
b. Type categories–(Fragment,Film,Foam,Pellet,Line)
Count number of plastics for each category and record on data sheet.
If available, prepare scale for weighing sample. Tare the scale with the
container you are using. Take weight in grams. Record weight (next to the count) on the data sheet.
Enter all data into Excel Sheet provided by 5Gryes
Photograph the sample! Make sure to note the sample #in photograph. This is a very important step for later shape, size, color & type identification.
STORING AND SENDING DATA
10. Keep all samples separate, and number all samples and data sheets. Dry everything. Number everything.
11. For each sample, fold up graph paper around the plastic pieces and put everything in the envelope provided. However, it is very important to keep the samples separate if there are more than one sample. You will need one envelope and one piece of graph paper for each sample.
12. Email the following information to carolynn@5gyres.org
Send photograph of plastic pieces on graph paper (foreach sample) with Sample # clearly stated
Send photograph of each data sheet (for each sample)
Send Excel Sheet (download from Trawl Share webpage) with your data filled in
Send other interesting photographs of trawl deployment, boat, recovery, and anything else you’d like to share. Make sure to explain where the photograph was taken.
13.Mail data sheet and plastic pieces to 5 Gyres
Data sheets should be filled out completely and accompany each piece of grid paper. Please make sure you include your contact information at the top of the data sheets.
Send completed data sheets and plastic sample to: 5Gyres, c/o TrawlShare Program, 5792 West Jefferson Blvd, Los Angeles, CA 90016

